


GENERAL FEATURES AND PARTS
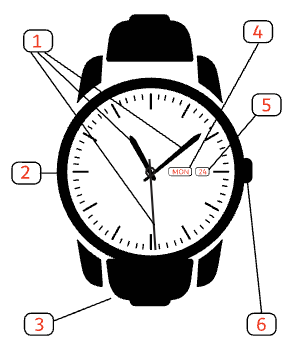
WITHOUT CHRONOGRAPH: 1. Hour, minute and second hands 2. Case 3. Bracelet or strap 4. Day 5. Date 6. Crown (date and time setting)
WITH CHRONOGRAPH (except Z50/Z60): 1. Hour and minute hands 2. Minute counter 3. Second hand 4. Hour counter 5. Second counter 6. Push-button A 7. Crown 8. Push-button B 9. Date
SWISS quartz movement. BRACELET OR STRAP in stainless steel or titanium, genuine calfskin, water-resistant rubber or nylon on in other top-quality materials. CASE in stainless steel or titanium to ensure quality and durability. WATER-RESISTANT up to 10 ATM (100m / 328ft) for standard watches, up to 20 ATM (200m / 656ft) for diving watches. DISPLAY of hands, indicators and numbers can be coated with a luminescent cover, which recharges with light in seconds for visibility in the dark.
Some models have a unidirectional ROTATING BEZEL that lets you track elapsed time.
- Turn the bezel counterclockwise to align the zero mark (60) on the minute hand.
- The position of the minute hand with respect to the zero mark on the bezel indicates the total number of minutes elapsed.

ADJUSTING THE HANDS IN POSITION 0
EXAMPLE: One or more of the chronograph hands are not in the correct position 0 and need to be adjusted (e.g. following a battery change).
- Pull the crown to position III.
- Press simultaneously for at least 2 seconds on push-buttons A and B (the second counter hand rotates 360 degrees; correction mode is enabled).
- Adjust the hands by briefly pressing several times on the push-button A (step-by-step by a brief push, continuous by keeping the push-button down), go to the following hand by pressing push-button B and again by briefly pressing push-button A several times to adjust.
- Push the crown down to position 1.


DATE AND TIME SETTING AFTER A BATTERY CHANGE
- Date/time indicated by the watch: 05 / 01:25 / MON
- Current date/time: 21 / 20:35 / FRI
- Pull the crown to position II (one notches), the watch continues to work.
- Turn it counterclockwise until the day before the current date 20 appears.
- Push the crown to position III, the second hand stops.
- Turn it counterclockwise until the date 21 appears.
- Continue to turn the crown until the current time 20:35 is displayed.
- Push the crown down to position I.
TIME, DAY (Z60) AND DATE SETTING
- Date/time indicated by the watch: 05 / 01:25 / MON
- Current date/time: 21 / 20:35 / FRI
- Pull the crown to position III (two notches), the second hand stops.
- Turn it counterclockwise until the day before the current day of the week appears THU.
- Push the crown down to position II.
- Turn it clockwise until the day before the current date 20 appears.
- Pull the crown to position II.
- Turn it in counterclockwise until the date 21 and the day of the week FRI appear.
- Continue to turn the crown counterclockwise until the current time 20:35 appears.
- Push the crown down to position I and screw it back.


TIME, DAY AND DATE SETTING
- Pull the crown to position II (one notch). Turn it counterclockwise until the day before the current date appears.
- Pull the crown to position III (two notches). Turn it to advance the watch hands clockwise until the current date appears. Then adjust the hands to display the time. The hands should go past 12 o’clock once if you set the time in the afternoon. Push the crown down to position I.
- For watches with a day and date indication, pull the crown to position II, turn it clockwise to change the day and counterclockwise to change the date.
- Push down the crown firmly to position I. Don’t forget to screw down the crown for diving watches.
Important to guarantee water resistance: It may be that your watch is equipped with a screw-down crown. To put the crown in position II, turn it counterclockwise to unscrew it.
Important: Remember to always screw down the crown after having made and adjustment, otherwise the water resistance will not be guaranteed.


SERVICE CENTERS
OUR SERVICE CENTERS WORLDWIDE
To access our list of Authorized Service Centers, please flash the QR code above or visit our web page at the following address:
https://www.wenger.ch/global/en/Product-support/cms/service
OUR SERVICE CENTERS (USA)
To access our list of US Authorized Service Centers, visit our web page at the following address: